

In Washington, where we built most of the boat, we cut down some trees for masts. This was about 3 years ago. With still having so much to think and do to build the boat our masts were neglected. We jumped a little ahead of ourselves and didn’t give the spars the attention they deserved. Rediviva is a gaff ketch which means she’ll have two masts, a taller one up forward (the main) and a shorter spar (the mizzen) aft. Now our main is still in good shape but the mizzen has a kink at one end. The trees being green needed to be turned every so often to remain straight and dry evenly, this didn’t happen as often as the mizzen needed. Our mizzen will not be scrapped we can still cut it up and use it for our main boom and gaff. Repurposed.


The main will now be the mizzen and we will build a better stick for our main. The new main will be laminated which will be stronger and we can control the taper. The main will not have any taper until you reach the hounds. The hounds are what the stays rap around. The stays are the wire rigging that hold the mast up. The four feet at the top of the mast will taper down a bit and then be painted white, as is tradition. The rest of the spar will be souped. Now to do this project we’ve gone back to the Napa Valley Marina and asked if they might rent us a space. The boatyard has been so amazing to us and found a little corner of the yard 40 feet long, exactly what we need, and about 5 feet wide for us to work.

That day we got started. First Garrett had to build 7 level stands for us to work from. The mast needs to be straight!


The lamination is five layers. 3 layers are two 20 footers and the other 2 layers consist of a 16 footer and two 12 footers. We did a test clamp up to make sure we had enough.

It took every clamp we owned and we made some 2by clamps as well. The 2by clamps are to keep the sides of the mast together and the million other clamps are to clamp it down tight.

To make sure the mast is straight Garrett also ran a string taut and then fastened little blocks to each stand. We put the first layer down and added another set of blocks to the other side. This seemed like such a huge project but once you get to doing it it’s just a matter of taking the steps and getting it done. Our keel timber was done is this very same way. It wasn’t as long but it was much wider and many more layers. This time we had, Garrett’s brother, Reid’s help to glue.

3 sets of hands is better than 2. We laid wax paper under the mast and over the blocks. It’s amazing for how sticky epoxy is it doesn’t adhere to wax or parchment paper.

Garrett and Reid spread out the epoxy while I made batch after batch of slightly thickened epoxy. It must’ve been 2 hours and the epoxy was spread on both sides of every layer and stacked. Then we worked quickly to get ALL the clamps on. Garrett’s hands wrenched them all tight, Reid laid down the wax paper, and I went around the mast scrapping the excess. Sorry there aren’t more photos of the lay up…sticky hands, but the camera was rolling.


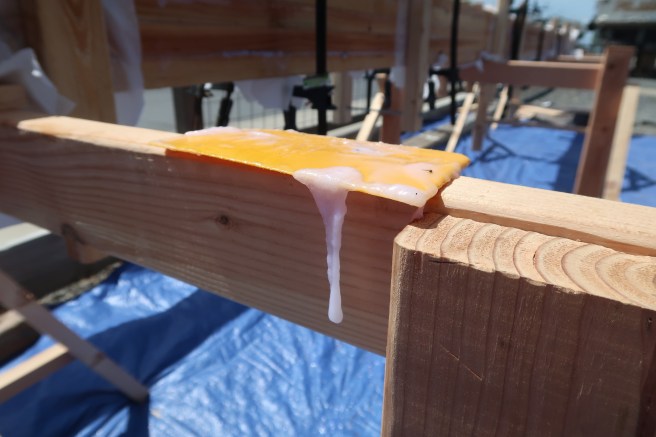
This was a long day that deserved the reward of a taco night! We made all 12 of the 2by clamps that morning, glued, clamped, and cleaned. There was awesome spill out of every seem meaning we have a solid lamination.


The next morning we drove out to see how she was settling. The first 2 layers were hard but the other 3 were still a little tacky. Good excuse to take the beautiful day off. We didn’t do anything interesting. Mostly sat outside in the shade with a glass of wine then made dinner. Garrett still couldn’t help himself from opening the computer and doing more research. On what? Who knows. “Everything,” he said to me.
The epoxy was frozen in time. Tough as nails. It feels really nice working in the boatyard. You just have to make sure you don’t stay too long. That’s the problem with yards. People get stuck. It can feel like a place where boats go to die but in this yard there are all types of projects. Weekend haul outers, mast builders, simple bottom jobs, some serious rebuilds, and the projects that never leave too. The hum of the yard is encouraging. Everyone slowly chipping and grinding away. We’re happy to be refreshing our relationship with the yard because come July (or so) we will be hauling Rediviva. As the summer heat is approaching we want to try and keep the haul out to a week or two just to add a few more layers of bottom paint and, drum roll please, step the masts!


Removing the clamps revealed one straight square mast. Now to shape. The main will be round and to get it there Garrett must first 8 side the mast (with the skill saw) and then plane those edges and then stepping down from Festool, to orbital, to finish sander. Glueing was the easy part 😉


The electric hand plane was up to bat first. Cleaning all four sides smooth. It wasn’t too bad as I scrapped as much as I could but behind the wax paper and clamps the epoxy was thick.

The glue between layers looked great. Garrett was very satisfied. This day also included cutting off the over hang of both the top and bottom to get the mast to 39 feet. The top end is flush but the bottom has the male (peg) partner for the mast step. Both masts are keel stepped. This means the masts go through the deck and sits atop a wood block (the mast step) with a female square carved out to receive the mast. It will be a snug fit and where the mast passes through the deck there will be locust wedges to snug it and then a canvas boot to keep the water out.

All this work
and
NO HELP
from Swab
… he was busy though… eating sticks.

We started last Wednesday and a week into the project today Garrett is almost done ruff rounding the mast. This post is just the first 3 days! To keep our yard fees down we hope to finish and move that mast to storage here until we’re ready to bring Rediviva back down river. The goal is to have the mast finished in two weeks. One more week to go and we are looking good. It’s nice to know that when we’re motivated the work goes quick. We’ll have to finish installing the motor and get the bowsprit and windlass situated and if we still have time maybe plank the deck!


Whoo! All this work in the spring and summer will hopefully pay off in the fall when we can hoist some sails!!!


That’s a work of art!
LikeLiked by 1 person