more woodland shenanigans

Here are some more pictures of the mast acquiring expedition!

WP_20150710_004 From tree, to snatch block, to truck.

WP_20150710_005 Ruth behind the wheel!

WP_20150710_010 Me….. Supervising……

0710151306 Once we got it to the trail we just tied it right up to the truck and dragged it along. I felt as though a little tree surfing was necessary!

0710151409b Always keep it classy… Who needs a trailer when you have some sticks to throw under to keep from scraping everything up.

DSCN4932 yup…

DSCN4933 - Version 2 
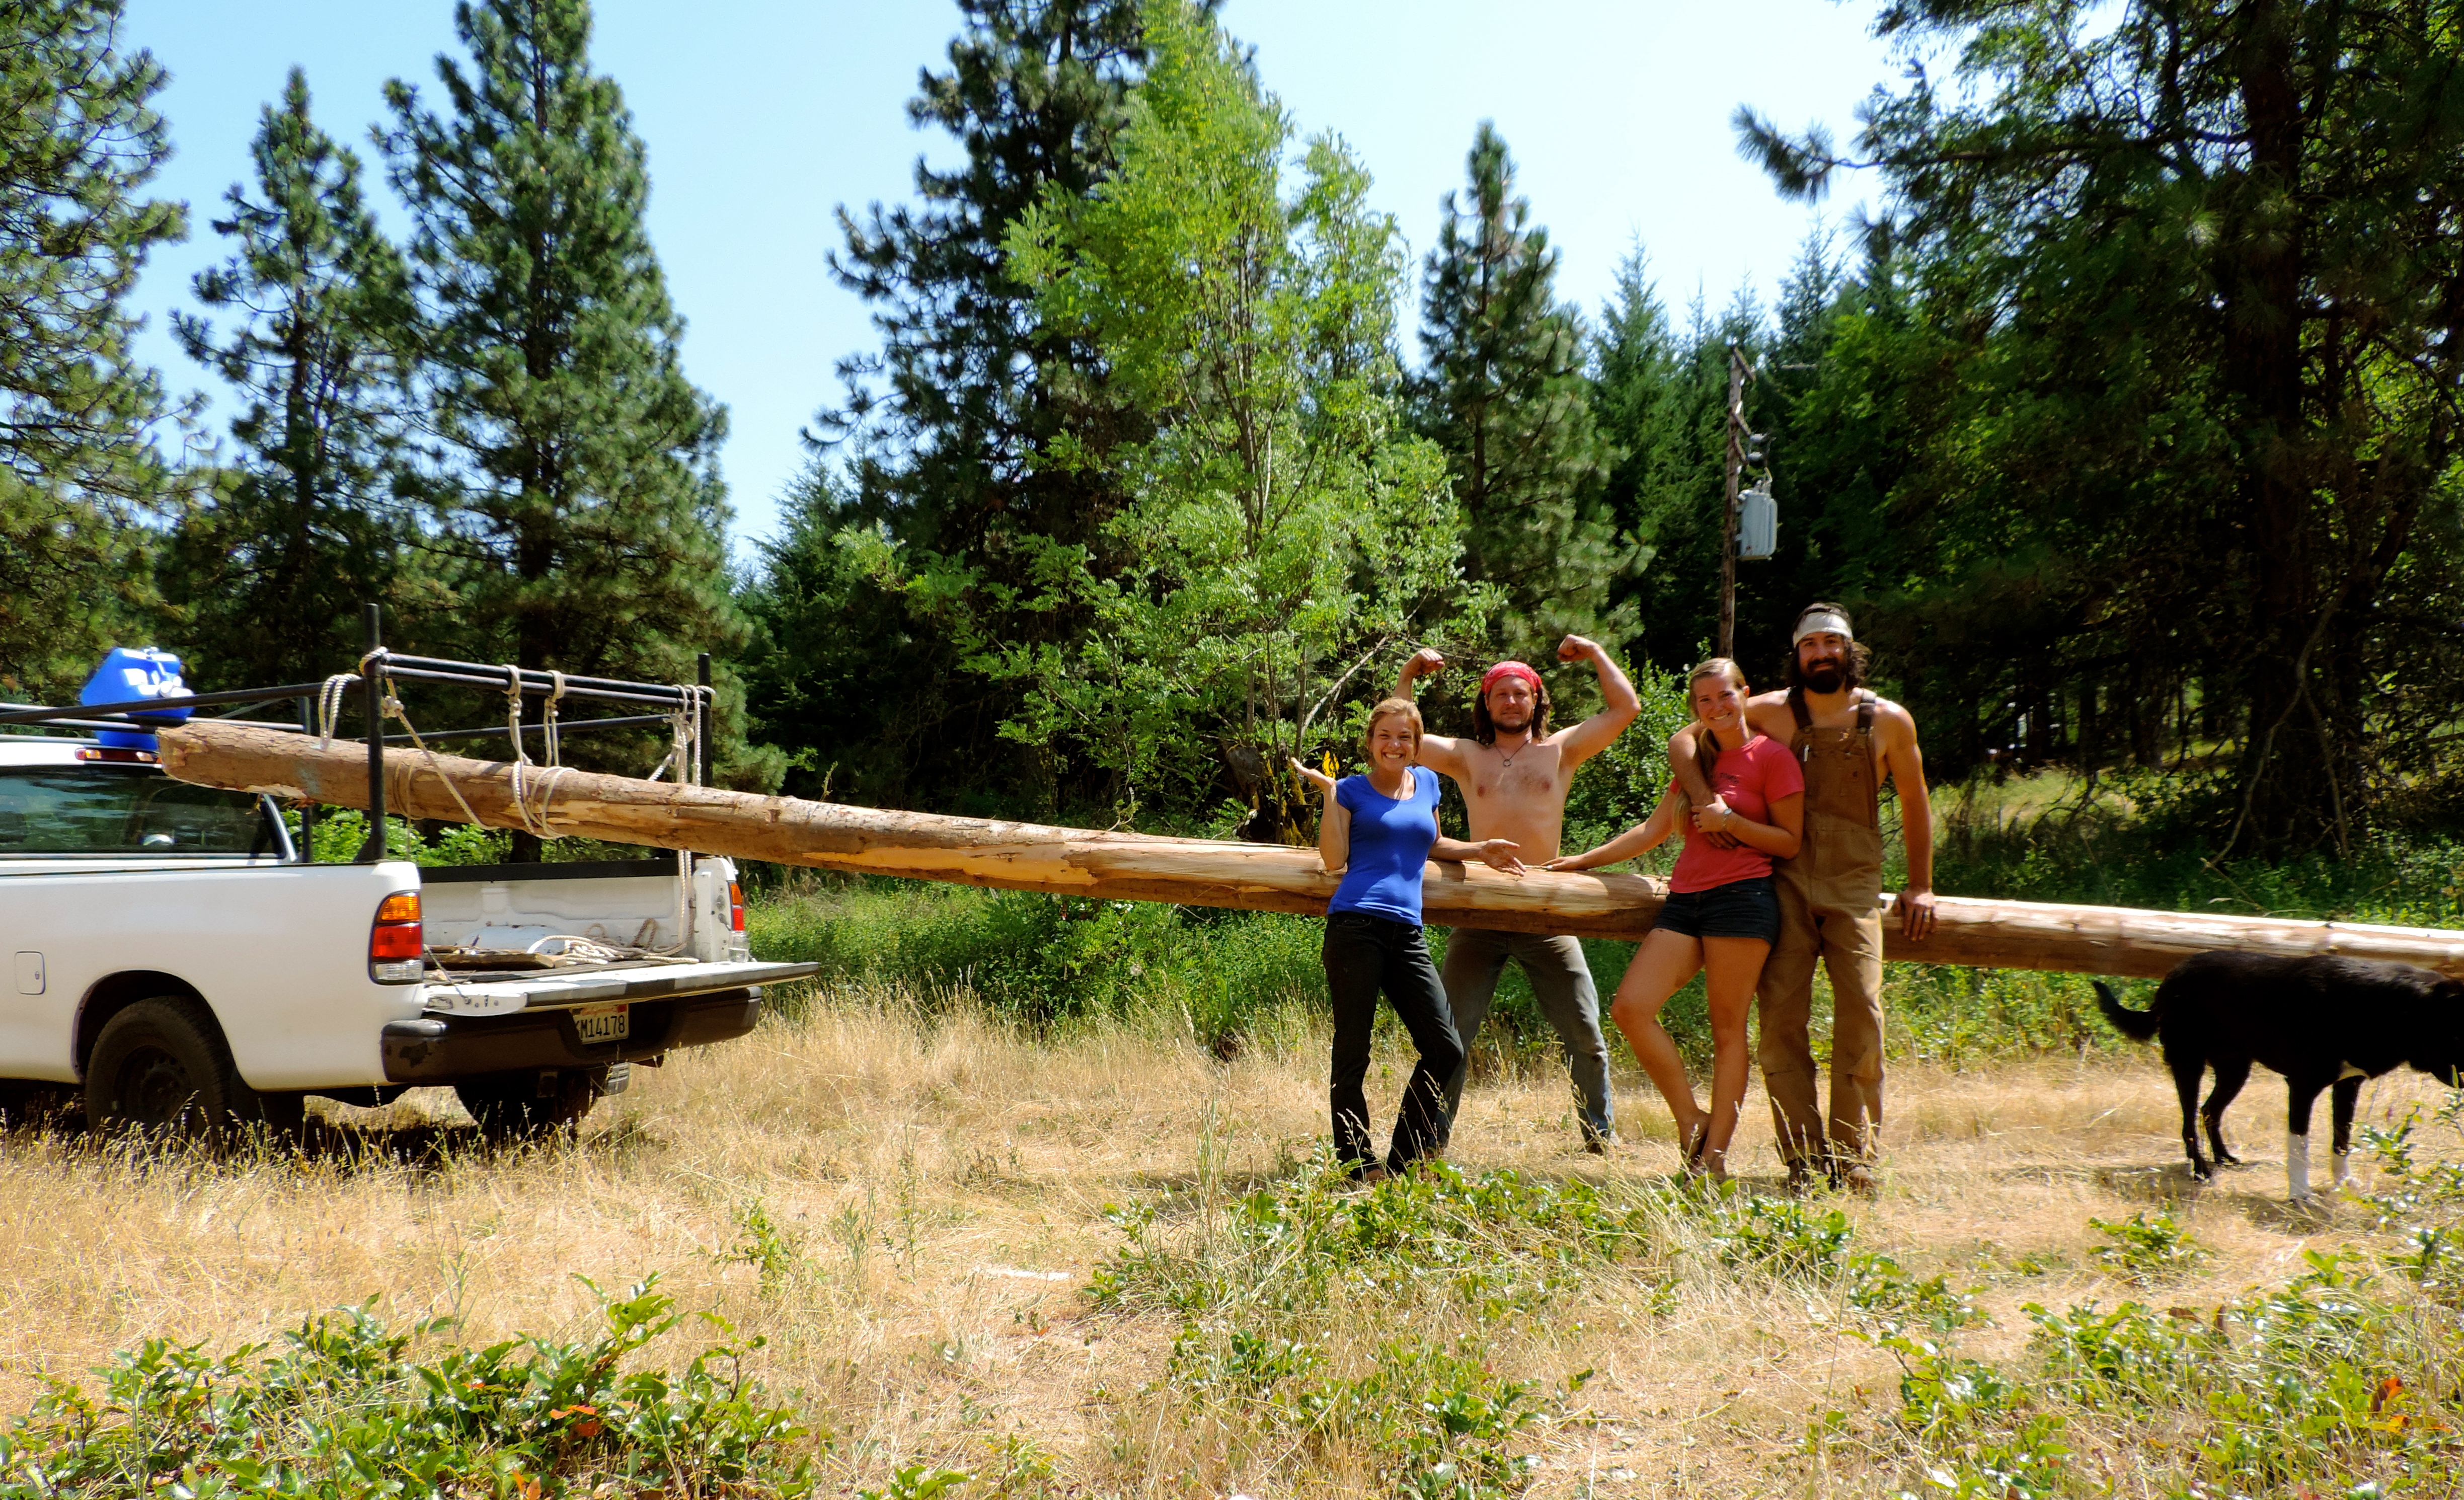
And cheesy group photo time!

DSCN4941  Perfectly straightish!

DSCN4944  A job well done now to celebrate!

All in all the whole thing went really well. It was two days of Hard work, but a fun experience to share with our friends. From complex problem solving, to inappropriate jokes about each others ”wood” we got it done, and had a great time doing it! Now onward to the keel flip!

drinking beer and felling trees!

Not many things go together better than drinking beer, and felling a tree with an axe! We have had a couple good friends hangin out with us for the last week or so. When we manage to stop sitting around drinking beer we have been able to make some real progress. Most importantly cutting down our main mast!!! It all started when my buddy DJ and I decided to take a drunken romp around the woods in “search” of a mast… Surprisingly we actually found one! A sweet tall narrow white fir. I would prefer to use douglas fir, but we were not able to find one of good enough quality to make a spar. When hunting for a spar you are looking for a tree that is strait obviously, but there’s more to it. You want to look for thick woods where the trees can’t grow in diameter, so they grow in height. They will grow tall, strait, and clear in search of the sun. This will also give you a tree with really tight grain. These are the reasons we went with this white fir rather than a lesser quality doug. We started off very carefully surveying the situation.

DSCN4854

Once satisfied with our calculations we forged ahead!

DSCN4863   DSCN4890   DSCN4904

Once down we started limbing everything.

DSCN4917

Now all we have to do is figure out how the hell were gonna get this thing out of the woods…..

We started off with a combination of come alongs, leverage, and brute strength to move it closer to the truck.

DSCN4922

We were able to bush whack the truck to within a couple hundred feet, so we grabbed one of our 200ft anchor lines, and tied a big snatch block to a tree to control the pulling angle.

DSCN4926

We managed to drag the thing out of the woods, but only with the proper application of beer, redneck ingenuity, and rebel calls…

More pictures of this endeavor to come when we figure out how to get them off of Ruth’s phone!

build update

We haven’t posted for quite some time so I figured it was time for an update. We were away for a week or so, but we have been making some progress.

We got the keel all glued up and poisoned (thats what the green stuff is).

DSCN4803

Next we did a little trimming and fine tuning. Then tacked on the patterns and marked the stations, rabbet, and bolt placement.

DSCN4806 DSCN4807

surprisingly everything lined up sorta like it’s supposed to!

DSCN4814

Once we finished that up we took a trip out to Tacoma to pick up our keel bolt material.

DSCN4829   DSCN4827

We had a bunch of 20ft steel rod sent out to be hot dip galvanized. We will cut them to size and thread them on each end to make the giant bolts that hold the ballast to our keel.

DSCN4830 DSCN4833 DSCN4838

We will have to wait for the machine shop to thread the rod, but we should be able to get everything else lined up for the ballast pour in the mean time.

fanciful wood science

So it’s been a while since the last post, unfortunately I had a pretty bad back injury that laid me up for almost a week… It’s all good now though, and we’ve still managed to get a bit done. We have removed the lofting floor, built the cradle, moved the keelson, and have started the final fitting of the keel pieces before we bolt it all together.

We built the cradle out of a big white fir that came down next to our friends house. White fir aka grand fir isn’t all that valuable, and the tree would have probably just been cut up for fire wood. Instead our friends milled it up into big beams for us, and it became our cradle. Then once we finish the boat it will probably become fire wood…

DSCN4719 DSCN4720

Once the cradle was built and leveled out we hooked two come alongs from the keelson to the base of a pine tree next to the shed. We worked in unison to slowly inch the keelson from the remains of the lofting floor to the cradle.

DSCN4724DSCN4730

It went surprisingly  easy. Which rarely ever happens… after the successful event we drank beer and stared at the fruits of our labor.

Next I started triming and fine tuning the pieces of the keel so everything goes together as it should.

DSCN4747 DSCN4749 DSCN4755

Probably a day or two more and we’ll be ready to glue and fasten all the pieces of the keel together, and turn the whole assembly on it’s side for the ballast pour!

Taking Shape

We are nearly ready disassemble the floor and move the keel on to the cradle for final assembly! We have all but a couple of the keel timbers shaped up, so I could’t help stacking a few of them up to see what it looks like!

DSCN4702 DSCN4703

O yes… That’s a keel…

Because Garrett can’t handle the STICKY

Ruth here:

“So because I’m an awesome person, I took over the rest of the sticky business. This is usually what happens. On one of our last restorations, Ronin, we decided to copper-plate the bottom which involved a whole lot of tar. Guess who had the nickname Tar Queen (hint it’s not Garrett). Since we got a few pieces done and glued up Garrett was able to start planing and shaping while I continued on expoying the rest.

DSCN4691 DSCN4698DSCN4690

Garrett gave me a few pointers on how to prepare my set up for epoxying quickly; like presetting all my clamps, getting the wax paper ready, and setting up the pieces in the order they will be layered. But, I found out even if you prep everything that doesn’t mean everything will go smoothly. Your blood, sweat, and angry words are really what glues that wood together. I have just one two-part piece left to join together and then we’re through with epoxy for the moment!

DSCN4708 DSCN4706 DSCN4700 DSCN4699

That’s not a smile that’s a cringe. But I still hate sticky less than Garrett so it’s not that bad. The things you do for the ones you love.”

shaping the keel

There’s nothing quite like the ring of a good chisel melting through good lumber. Although we are using “construction grade” fir we spent hours sorting through, and hand picked all 50  pieces for the keel. Many people don’t know that if you take the time and effort there are some real gems at any lumber yard with a large enough inventory. Sure, we may have gone to three or four different yards to come up with all that we needed but in a way thats part of the fun. Like a hunt for anything elusive, the harder it is to find the sweeter it will be when you do. So I continue on happily with a cup of cold coffee carving away at my prize, while my chisel sings a song of wood and iron.

We have progressed to the next stage of our build where we have begun shaping the individual pieces of the keel so they will all come together into the correct shape. So far we have just been gluing them into large chunks big enough to cut down to size. This is where those keel patterns we made earlier will come into play. We plane down the sides of the timbers first so they are relatively flat. then tack on the pattern to the side and trace out the shape.

DSCN4662 DSCN4663

Next we draw 90 degree lines across the top about every 2 or so inches. On the side that we have the shape traced out we measure down from the top of the timber to the outline of the pattern. Then on the other side of the timber along that 90 degree line we measure down that same distance. Now we have a point on each side to run a hand saw down to.

DSCN4665

Once we have made a bunch of cuts along the timber down to the depth of the outline we can take a chisel and start hacking away the big chunks. Since there are cuts down to the correct depth all along the timber it easily guides the chisel to take off just the right amount for a rough shape.

DSCN4666 DSCN4667 DSCN4697  DSCN4669DSCN4682

Next we progress to a electric planer to bring it down within a 16th of an inch or less.Then we move on to a hand plane to fine tune the face to exactly the right shape.

DSCN4679 DSCN4683 DSCN4688

It can be a long monotonous process. So I set up a comfortable area to work, get in the groove, and just except that it’s gonna take a while.

things and stuff

We are still working on the keel getting all the individual pieces glued up. We are making pretty good progress, and already have7 out of 9 done. I expect to have the rest glued up in a couple days if weather cooperates. Then we will begin shaping all the timbers to their finished dimensions. Lots of work with chainsaw, skill saw, and planers to hack them into more or less the right shape.

DSCN4622 DSCN4626

We took a trip out to our friends sawmill today to pick up the beams for the cradle that we will build to support the boat.

DSCN4658 DSCN4653

Once we’re done gluing the keel beams up we will remove the lofting floor and use these beams to build a very stout cradle that will be able to support the boats weight as it grows.

We were also able to check out some of the western red cedar they are cutting for our planking.

DSCN4635 DSCN4639

And here’s a couple shot’s of that sexy black locust we are using for our frames.

DSCN4654 DSCN4642

Swab and Daisy always have fun together even though she just bites his face the whole time… He loves the abuse.

DSCN4655

Constructing the Patterns for the Rest of the Keel Pieces

Ruth here:

“We almost weren’t able to complete all the patterns in one day but we pushed on. Racing the sun and coming up with some alternative material we have the remaining 9 pieces in pattern. We used mostly 1/8” mahogany ply which is so beautiful and smells amazing when cut into. It was kind of a fun project. Like putting together a puzzle but you are also creating your pieces. These will be held up to our laminated sections and used to trace out the correct shape for the finished product.

DSCN4589 DSCN4591

I attempted to take a panoramic picture of the keelson pattern but had no luck. Here’s the best out of the like 20 takes. It’s kind of neat still.

DSCN4596

I worked on the stern segments while Garrett worked on the bow parts.

DSCN4600 DSCN4607DSCN4608

This was really helpful for to me to further comprehend how the keel was going to come together. I can now better envision how these patterns will become 3 dimensional and become the mighty back-bone of our ship. Garrett’s had this boat in his head for a long time and is able to see it laid out and how the construction will  make it all come together. I’m learning a little bit more as we go rather than having fully understood what we were doing from when we started. I have more and more ah-ha moments of “Oh! this is how that goes,” it’s really exciting seeing everything unfold.

DSCN4602 DSCN4606

We’ve set aside all 10 patterns awaiting wood.”

DSCN4615